All posts by Caroline Schoofs

Baking tips

Baking tips

SOFTENED BUTTER (NOT MELTED) is important for many types of cookies. Creaming it in the first steps of the recipe incorporates air into your cookie and also helps the butter mix evenly. Forgot to remove it from the fridge to soften? Two options. First option is to cut your butter into 1⁄2 tbsp. portions and leave on your counter for appx. 30 minutes while you gather and measure out the rest of your ingredients. The other option is to cut the butter in half and microwave on 10% power in two 30-second intervals.

BUTTER IN YOUR DOUGH CAN CONTINUE TO SOFTEN, especially in a warm kitchen. This will cause your cookies to spread more. To prevent this from happening, refrigerate your dough for 10–15 minutes before baking and remove portions just before baking.

GONE TOO FAR? Melted butter needs to be chilled very quickly in order to work in a baking recipe. Stir large ice cubes around in the melted butter for less than a minute to chill the butter quickly back to a softened state. The amount of water melted into the butter during this process is negligible.

• For a smooth glaze over sugar cookies, spread glaze in an even layer using the back of a spoon.

• Run a fluted pastry wheel over an unbaked cookie for pretty texture – works great for making Christmas trees look like they have garland.

• Baking soda as a leavener starts reacting as soon as it is wet, so there is a time limit on how long it will make cookies rise. Baking powder reacts twice as a leavener, when it is becomes wet and again when it is heated.

• Cookie dough made with baking powder can be made up to 7 days ahead and removed from the refrigerator to bake while cookie dough made with baking soda should be used within 2 days.

• OVER-BAKE YOUR COOKIES? Although there is no remedy for burnt cookies, remember that cookies continue to bake after being removed from the oven. If you’ve allowed your cookies to bake a few minutes too long, remove them immediately from the warm cookie sheet and carefully transfer to a wire rack. If you really like soft cookies, remove your cookies from the oven before they are completely done and let your hot cookie sheet help with the carryover baking. This will give you the softest possible results while still being thoroughly cooked in the middle.

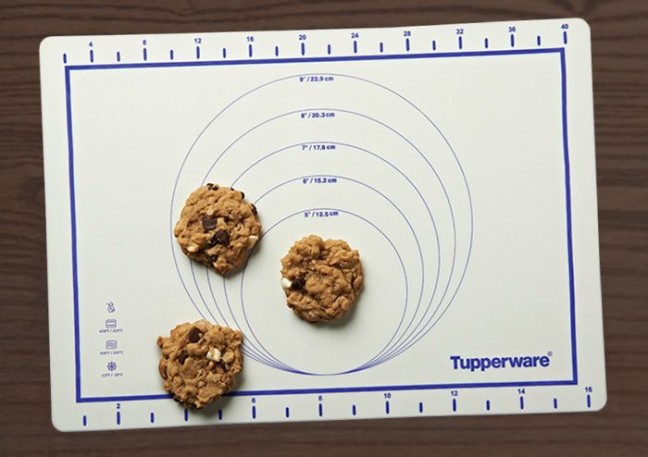
• Rotate cookie sheet during baking for even browning. If using 2 cookie sheets at once, their placement on the different level racks should be rotated as well.

• NO BROWN SUGAR? Use 1 tbsp. molasses mixed into 1 cup granulated sugar as a substitute for light brown sugar or 2 tbsp. per cup as a substitute for dark brown sugar.

• To prevent your cookies from baking together, bake in staggered rows.

• To avoid overly crisp edges, use chilled dough and a cool baking sheet (not one that is already warm from the oven).

• USING FROZEN HOMEMADE COOKIE DOUGH? Place dough portions on cookie sheet and allow to defrost for about 20–60 minutes. Then bake as directed. (They may require an additional few minutes of bake time.)


Steamed Salmon with Snow Peas

Ingredients

  • 1 lb. sockeye salmon fillet
  • Olive oil
  • Salt and freshly ground pepper
  • Pink peppercorns
  • 6 oz. snow peas

Preparation

  1. Fill water tray to minimum fill line. Place salmon in the base of Tupperware® Smart Steamer. Brush salmon with olive oil and season with salt, pepper and pink peppercorns
  2. Place snow peas in Colander and place Colander on top of the Steamer Base. Season peas with olive oil, salt pepper and pink peppercorns. Cover, place in the microwave and heat on high for 9 minutes, until salmon flakes easily with a fork, is opaque and it reaches an internal temperature of 145 degrees.
  3. Remove from microwave & let stand for 5 minutes before serving.


To order the products used in this recipe, click on the images below:Intelli-Vap


Flan in minutes

Ingredients:

  • 4 eggs
  • 1 ½ cups of 2% milk
  • ¾ cup granulated sugar
  • ¼ tsp. salt
  • 1 tsp vanilla extract
  • bottled caramel

Preparation:

  1. Place first five ingredients in base of your PowerChef, using the PowerChef Whip accessory cover. Replace cover, turn handle and blend until well combined. Pour mixture evenly into four Snack Cups and place in the base of Tupperware® SmartSteamer.
  2. Fill water tray to minimum fill line and microwave at 50 percent power for 16 minutes or until custard is set and a knife inserted into the center comes out clean.
  3. Chill in refrigerator for several hours.
  4. To serve, run a knife around the edges to loosen and invert onto plates. Top with a prepared caramel sauce if desired.


To order the products used in this recipe, click on the images below:Intelli-VapExtraChef ens completaccessoire batteur extra chef   petits friands

Beef & Broccoli

Ingredients

  • 1 1⁄2 –2 lb.flank steak, cut into 4 quarters
  • 1 tsp. Steak & Chop Seasoning
  • 4 garlic cloves, peeled and minced in Chop ’N Prep Chef
  • 1 3⁄4 cups beef stock, divided
  • 1⁄2 cup low sodium soy sauce
  • 1 tbsp. sesame oil
  • 1⁄4 cup brown sugar
  • 3 Tbsp. corn starch
  • bag frozen broccoli florets

Preparation

  1. Season steak with seasoning and place in base of Tupperware Microwave Pressure Cooker. In a medium bowl, combine garlic, 1 1⁄2 cups beef stock, soy sauce, sesame oil and brown sugar. Pour over steak. Add extra stock if meat is not fully submerged. Seal and microwave on high power 30 minutes.
  2. Remove from microwave and allow pressure to release naturally until red pressure indicator fully lowers, about 10– 15 minutes.
  3. Remove steak to a cutting board and pull apart using 2 forks.
  4. In small bowl, whisk together corn starch and remaining 1⁄4 cup beef stock. Whisk into warm liquid in base of Pressure Cooker. Stir frozen broccoli into liquid in Pressure Cooker. Seal and microwave on high power 5 minutes. Serve warm and over rice, if desired.


To order the products used in this recipe, click on the images below:

autocuiseurhachoir gagne temps

Easy Mushroom Risotto

Ingredients

– 1 cup Arborio rice
– 8 oz. fresh mushrooms, sliced
– 1 tsp. coarse kosher salt
– 1 Tbsp. extra virgin olive oil
– 2 1⁄4 cups vegetable stock or water*
– 1 small onion, peeled, halved and chopped in Chop ’N Prep Chef
– 1⁄2 cup Parmesan cheese

Preparation

  1. Rinse Arborio rice in strainer until water runs clear, about 30–60 seconds.
  2. Pour rice into Tupperware Microwave Pressure Cooker base and add vegetable stock, mushrooms, onion, salt and oil. Seal and microwave on 70% power 13 minutes.
  3. Remove from microwave and allow pressure to release naturally until red pressure indicator fully lowers, about 4–6 minutes, before opening.
  4. Remove cover and stir in Parmesan cheese


To order the products used in this recipe, click on the images below:

autocuiseurhachoir gagne temps


Roast Beef with Horseradish Cream Sauce

Ingredients:

– 3 lb. beef eye round or rump roast
– 1 Tbsp. Steak & Chop Seasoning
– 3 cups beef stock
– 3⁄4 cup sour cream
– 1 tbsp. horseradish
– 1⁄4 tsp. coarse kosher salt
– 1⁄4 tsp. black pepper
– 1 tbsp. mayonnaise
– 3 green onions, chopped using Chop ’N Prep Chef

Preparation:

  1. Coat roast with seasoning and place in base of Tupperware Microwave Pressure Cooker. Pour beef stock into base to maximum fill line, about 3 cups.*
  2.  Seal and microwave on high. Guidelines for doneness: 20 minutes for a medium rare center; 25 minutes for a medium center; 30 minutes for a well done center.
  3. Remove from microwave and allow pressure to release naturally until red pressure indicator fully lowers, about 10-15 minutes.
  4. Remove roast to cutting board. Allow to rest at least 10 minutes before slicing.
  5. Meanwhile mix together remaining ingredients to create horseradish cream sauce.
  6. Slice beef and serve with sauce.

*If the shape of your roast causes it to rise about the max fill line, simply trim off that portion. Submerge this piece into the beef broth next to your roast. This piece will be well done. Any portions above the max fill line or not submerged in broth may burn.

To order the products used in this recipe, click on the images below:

autocuiseurhachoir gagne temps

Chicken Orzo Soup

Ingredients:

– 3 lb. whole chicken
– 4 cups water, divided
– 2 carrots, peeled & cut in 2” pieces
– 2 celery stalks, peeled & cut in 2”pieces
– 1 medium onion, peeled and quartered
– 2 garlic cloves, peeled
– 1 cup orzo pasta
– 1 1⁄2 tsp. coarse kosher salt
– 1⁄2 tsp. black pepper
– 1 lemon, juiced using Zest N’ Press® Gadget

Preparation:

  1. Place chicken breast side up in base of Tupperware Microwave Pressure Cooker, and add 3 cups water. Chicken should be submerged in water and contents should not be above the max fill line. Seal and microwave on high power 20 minutes. 20–25 minutes for a 3lb. chicken.
  2. While chicken cooks, add carrots, celery, onion and garlic to base of Quick Chef® Pro System fitted with blade attachment. Cover and turn handle until roughly chopped.
  3. Remove Tupperware Microwave Pressure Cooker from microwave and allow pressure to release naturally until red pressure indicator fully lowers, about 10 minutes.
  4. Check to ensure internal temperature of chicken has reached 165° F/ 75° C. Remove chicken from base. Add remaining cup of water, chopped vegetables and remaining ingredients to base of Tupperware Microwave Pressure Cooker. Seal and microwave on high power 10 minutes.
  5. While pasta and vegetables are cooking, remove chicken meat from bones, discarding skin. Shred larger pieces using 2 forks.
  6. Remove Pressure Cooker from microwave an allow pressure to release naturally until pressure indicator fully lowers, about 2 minutes.
  7. Stir shredded chicken into soup and serve.


To order the products used in this recipe, click on the images below:

autocuiseurrapidochefpresse agrume et zesteuse

538$ to spend on free Tupperware products until October 9th!

FREE Extra Host Credit

Host a party with $650 or more in sales, plus have two friends who date and hold their own parties—and for two weeks only you can receive Extra Host Credit for FREE to use towards exclusive Host Gift Specials or shop from the current catalog.

Extra_host_credit


6-Pc. Cookware Collection featuring new Chef Series II Cookware! Exclusive for hosts

Collection includes never-before-offered, hard anodized Chef Series II 8″/20 cm Nonstick Fry Pan with Cover, perfect for omelets, and Chef Series II 11″/28 cm Nonstick Fry Pan with Cover for larger portions, plus the stainless-steel Chef Series 14″/35 cm Casserole Pan with Cover. Include cast-hollow, stay-cool handles. $837 value. 8764 $440 in Host Credit

Ens 6 pces Serie Chef

Whole kernel corn with the Tupperware Mandolin

Preparing whole kernel corn  from fresh corn on the cob is a simple and easy process thanks to the Tupperware mandolin. Store it in the freezer and you’ll have fresh kernel corn all year round! It’s then easy to add to your salads, pizzas, in your chilli, vegetable rice or in your shepherd’s pie!

Preparation

  1. Leave the husk on the corn and place it in the microwave for cooking. Every cob needs to cook for 2 minutes. (2 cobs = 4 minutes, etc.). Shuck, then leave it aside to cool.
  2. Set the thickness of the mandolin to 6. Using a knife, cut the cooked corn in half and attach the mandoline holder to the cob. Push cob through mandolin to cut off grains..
  3. Each cob should give you about 1 cup of whole kernel corn. Store them in the freezer using your Freeze-it or Freezer mates containers.

IMG_9644

mandoline gagne-tempsFreeze-it petit ens

Blueberry Corn Salad

Beautiful and festive salad

Ingrédients
1 cucumber
½ small red onion, peeled
2 cups corn, fresh or thawed
1 cup fresh blueberries
¼ cup cilantro, chopped using Chop ’N Prep Chef
1 jalapeno pepper, seeded and chopped using Chop ’N Prep Chef
Dressing
1 lime, juiced using Zest ’N Press® Gadget
3 tbsp. extra virgin olive oil
2 tbsp. honey
½ tsp. Southwest Chipotle Seasoning
½ tsp. coarse kosher salt
¼ tsp. black pepper
Preparation
1. Set Mandoline round knob to #2, triangular knob to “lock” and select thestraight v-shaped blade insert.
2. Using a knife, cut cucumber in half and attach one half to food guider and push guider down Mandoline to create cucumber slices.
3. Using a knife, cut cucumber slices in half and place in medium bowl.
4. Attach red onion to food guider and push down to slice. Add slices to medium bowl with cucumber.
5. Add corn, blueberries, cilantro and jalapeno to bowl and toss to combine.
6. To make dressing, combine all ingredients in Quick Shake® container and shake.
7. Add dressing to salad and toss again to combine.

mandoline gagne-tempspresse agrume et zesteusemelangeur rapidecuilleres a mesurerBols étonnants